Visual Studio Code (VS Code) has emerged as a popular choice among developers for its versatility and extensive features.
If you’re new to programming or looking to streamline your Python coding experience, this article will guide you through the process of running Python code in Visual Studio Code.
We’ll cover everything you need to know, from installation to executing your first Python program.
Let’s get started!
How to run Python code in Visual Studio Code
Before we can begin running Python code in VS Code, we need to ensure that both the editor and the Python extension are properly installed on your system.
Here’s a step-by-step guide:
Download and install Visual Studio Code (if you haven’t yet downloaded it):
- Visit the official Visual Studio Code website and download the installer suitable for your operating system.
- Run the installer and follow the on-screen instructions to complete the installation process.
1. Open Visual Studio Code and Install the Python extension
Installing the Python extension in Visual Studio Code is necessary when you want to run Python code within the editor for several important reasons:
- Language-Specific Features: The Python extension provides language-specific features and enhancements tailored specifically for Python development. These features include code formatting, syntax highlighting, code completion, and code snippets. They make writing Python code more efficient and enjoyable.
- Integrated Development Environment (IDE) Features: The Python extension brings IDE-like features to Visual Studio Code, empowering developers with capabilities such as linting (static code analysis), debugging, automatic imports, and refactoring tools. These features greatly enhance the development experience and help catch errors and improve code quality.
- Debugging Capabilities: The Python extension offers powerful debugging capabilities, allowing developers to set breakpoints, step through code, inspect variables, and analyze runtime behavior. Debugging is a crucial aspect of software development, enabling efficient bug fixing and troubleshooting.
- Virtual Environment Support: Managing virtual environments is essential when working on Python projects with specific dependencies. The Python extension integrates seamlessly with virtual environments, enabling developers to create, activate, and switch between different environments. This ensures project isolation and consistent dependency management.
- Package Management Integration: The Python extension integrates with popular Python package managers like pip and conda, enabling developers to easily install, update, and manage Python packages directly within Visual Studio Code. This streamlines the package management process and ensures smooth integration with project dependencies.
- Test Framework Integration: The Python extension provides integration with popular Python testing frameworks such as pytest and unittest. This allows developers to run tests, view test results, and navigate to specific test cases from within Visual Studio Code. It facilitates efficient testing and supports test-driven development practices.
- IntelliSense and Documentation: The Python extension leverages Python’s built-in documentation capabilities to provide context-sensitive help and documentation for Python modules, functions, and classes. IntelliSense suggestions further enhance productivity by providing relevant code completion options as you type.
Python extension for Visual Studio Code enriches the development experience for Python programmers.
It combines essential features like language support, linting, debugging, virtual environment management, package management, testing integration, and module documentation.
So, here’s
How to install Python extension for Visual Studio Code,
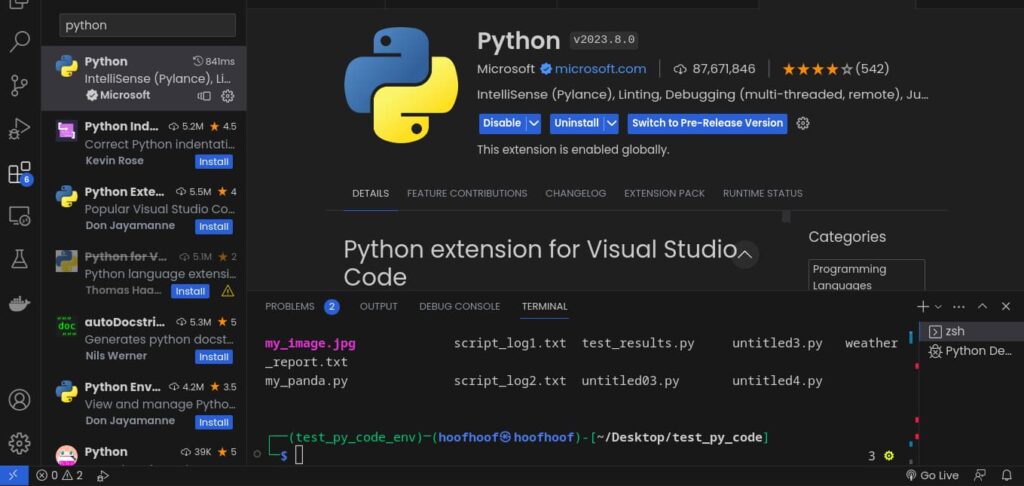
Open Visual Studio Code and click on the Extensions icon in the sidebar (or use the shortcut Ctrl+Shift+X).
Search for “Python” in the Extensions Marketplace.
Click on the “Python” extension by Microsoft and click the Install button.
After the installation, click the Reload button to activate the extension.
2. Create a Python Project in Visual Studio Code (if you haven’t)
Now that we have Visual Studio Code set up with the Python extension, let’s create a Python project:
- Open Visual Studio Code:
- Launch Visual Studio Code by clicking on its icon in the Apps list or using the relevant shortcut.
- Create a new folder:
- Choose a location on your computer where you want to store your Python project.
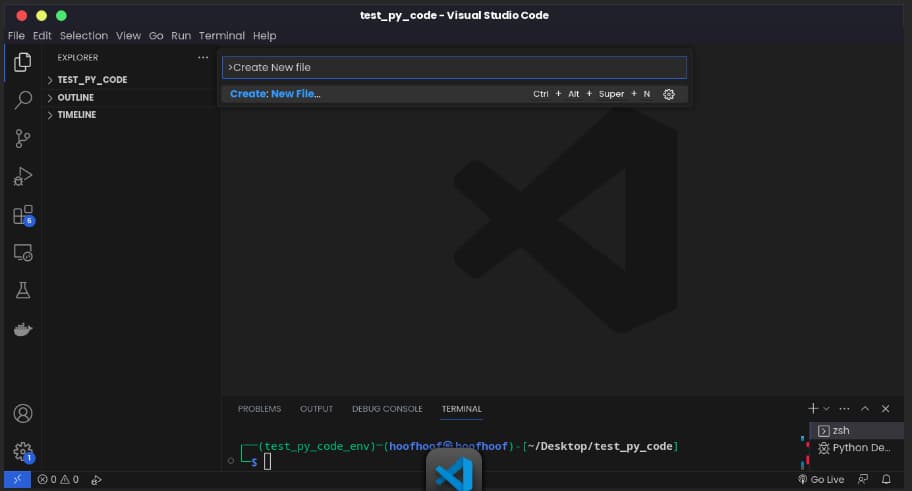
- Open the Command Palette (View → Command Palette or Ctrl+Shift+P) and type “Create: New File.”
- Select “Python: Create New Blank Python File” from the dropdown and provide a name for your file.
- Set up the virtual environment (optional but recommended):
- Open the Command Palette again and type “Python: Select Interpreter.”
- Choose the Python interpreter you want to use for your project.
- If you don’t have a virtual environment set up, select “Enter interpreter path” and specify the path to your Python executable.
Here’s an image showing how to create a new Python File in Visual Studio Code using the command palette shortcut:
3. Write and run your Python code
Now that our project is ready, let’s write and execute our Python code in Visual Studio Code:
Writing Python code:
- Open the Python file you created in the previous section.
- Start writing your Python code in the editor window. You can also use the IntelliSense feature for code suggestions.
Here’s an example code that you can use to execute:
Let’s roll some dice!
import random

def roll_dice():
    return random.randint(1, 6)

# Prompt the user to roll the dice
input("Press Enter to roll the dice...")

# Roll two dice
dice_1 = roll_dice()
dice_2 = roll_dice()

# Calculate the total
total = dice_1 + dice_2

# Display the result
print("You rolled a", dice_1, "and a", dice_2)
print("Total:", total)

# Check if it's a winning roll
if total == 7 or total == 11:
    print("Congratulations! You win!")
elif total == 2 or total == 3 or total == 12:
    print("Sorry, you lose.")
else:
    print("It's a draw.")
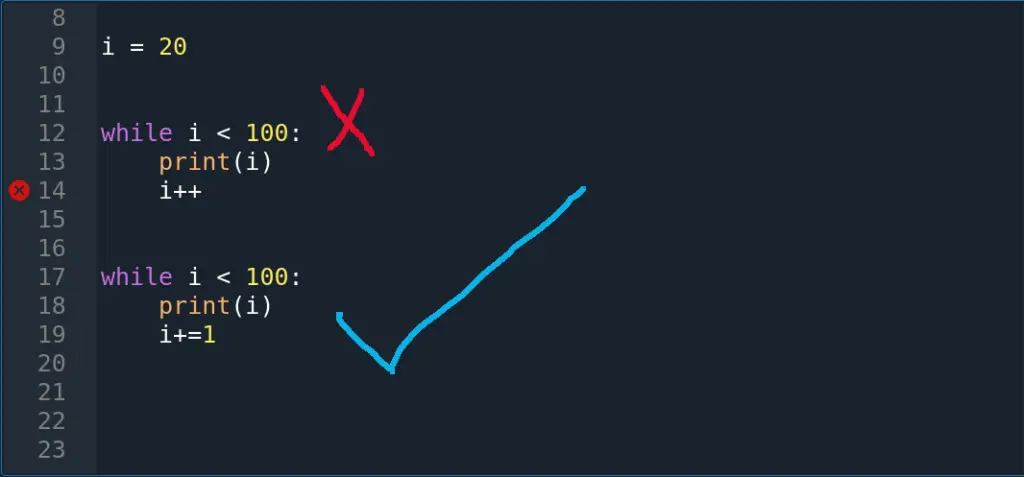
In this code, we define a function
roll_dice()that simulates rolling a single six-sided dice. The user is prompted to roll the dice by pressing Enter.Two dice are rolled, and the total is calculated.
The code then displays the individual dice rolls, the total, and determines if it’s a winning, losing, or draw roll based on the game’s rules.
Now that you have an example code, here’s
How to run Python code in VS Code
To run the entire Python code in Visual Studio Code, follow these steps:
Step 1: Make sure you have your Python file open in the editor window
Before running your Python file, ensure that you have it open in the editor window of Visual Studio Code.
You can open an existing Python file by navigating to the file location on your computer and double-clicking on it, or you can create a new Python file by going to File → New File or using the shortcut Ctrl+N.
Here’s an example image showing our code example for rolling the dice opened in Visual Studio Code:

Step 2: Press CTRL + F5 (shortcut) or go to the “Run” menu at the top VS Code window and select the “Start without debugging” option
Once your Python file is open in the editor window, you have two options to run it.
The first option is to use the keyboard shortcut Ctrl+F5.
This shortcut tells Visual Studio Code to execute the Python file from start to finish.
Alternatively, you can go to the “Run” menu at the top of the VS Code window.
Click on the “Run” menu and select “Start Without Debugging” from the dropdown options.
This will have the same effect as using the Ctrl+F5 shortcut.
To run a specific portion of code within your Python file, do this:
- Select the desired lines of code that you want to run. Click and drag the cursor to highlight the lines or use the keyboard arrow keys while holding the Shift key to make a selection.
- Once the desired lines are selected, use the shortcut Shift+Enter. Alternatively, you can go to the “Run” menu at the top of the VS Code window and select “Run Selection/Line in Python Terminal.”
- Visual Studio Code will execute the selected portion of the code. The output, if any, will be displayed in the terminal window.
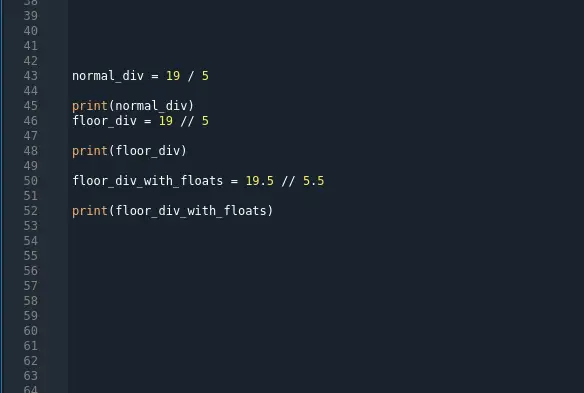
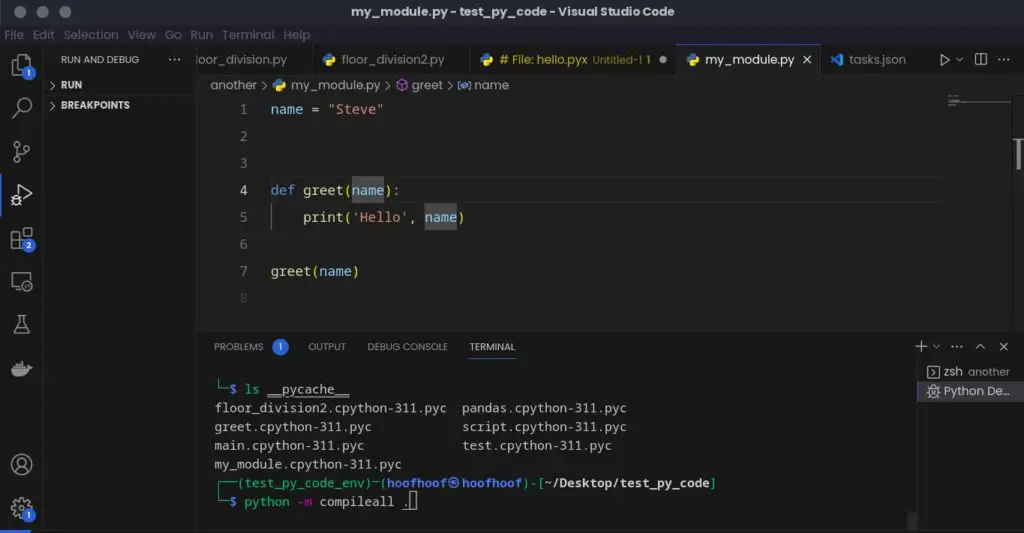
Here is an example showing how to execute a portion of Python code that is a for loop. Note that the only code that gets executed in this example will be the for loop only.
To run a specific portion of code (e.g., just the second for loop):
- Select the lines for the whole for loop block in the editor by clicking and dragging the cursor or using the arrow keys while holding the Shift key.
- Press Shift+Enter on your keyboard or go to the “Run” menu and choose “Run Selection/Line in Python Terminal.”
- Visual Studio Code will execute only the selected line, and you will see the following output in the terminal window:
Now, back to executing Python code.
Step 3: Visual Studio Code will execute your Python file while displaying the results in the terminal window
After initiating the execution of your Python file, Visual Studio Code will start running it from the beginning of the code to the end.
It will process each line and perform the specified actions or computations.
If your Python code produces any output, such as print statements or variable values, it will be displayed in the terminal window within Visual Studio Code.
For example, you should see the result of rolling the dice at the bottom where the Terminal window for Visual Studio Code is located:

And that’s how you execute Python code in Visual Studio Code.
By following these steps, you can ensure that your Python file is open, initiate the execution of the file, and observe the output in the terminal window within Visual Studio Code.
This allows you to test and run your Python programs seamlessly.
How about, executing a .py file in Visual Studio Code?
Let’s see how you can do that.
How to execute Python script in VS Code Terminal
When working with Python in Visual Studio Code (VS Code), you have the flexibility to execute your Python scripts directly in the integrated terminal.
This allows you to interact with your code and see the results in real-time.
Let’s explore the step-by-step process of executing a Python script in the VS Code Terminal:
Step 1: Open the Python script file
To execute a Python script, make sure you have the script file open in the editor window of VS Code.
You can either open an existing Python script or create a new one by going to File → New File or using the shortcut Ctrl+N.
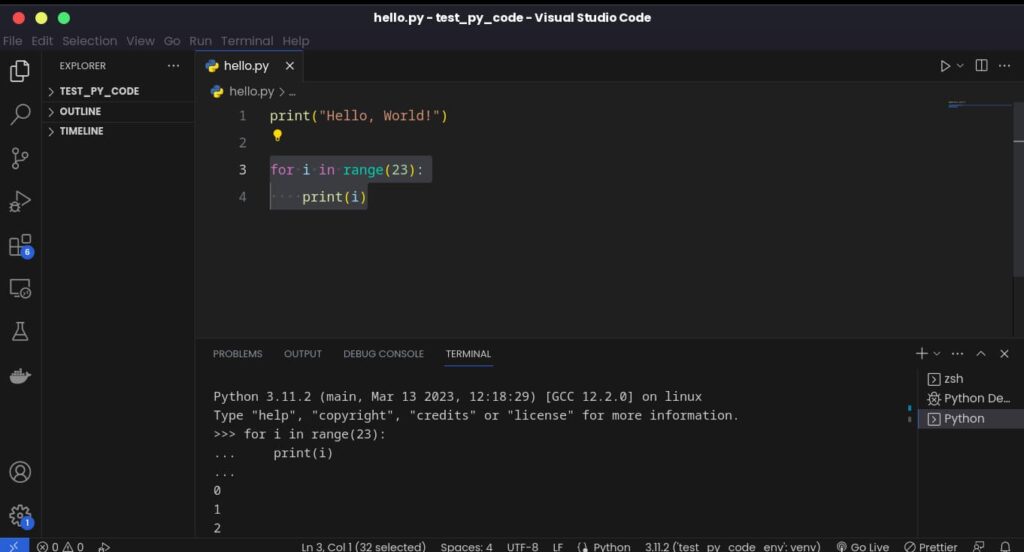
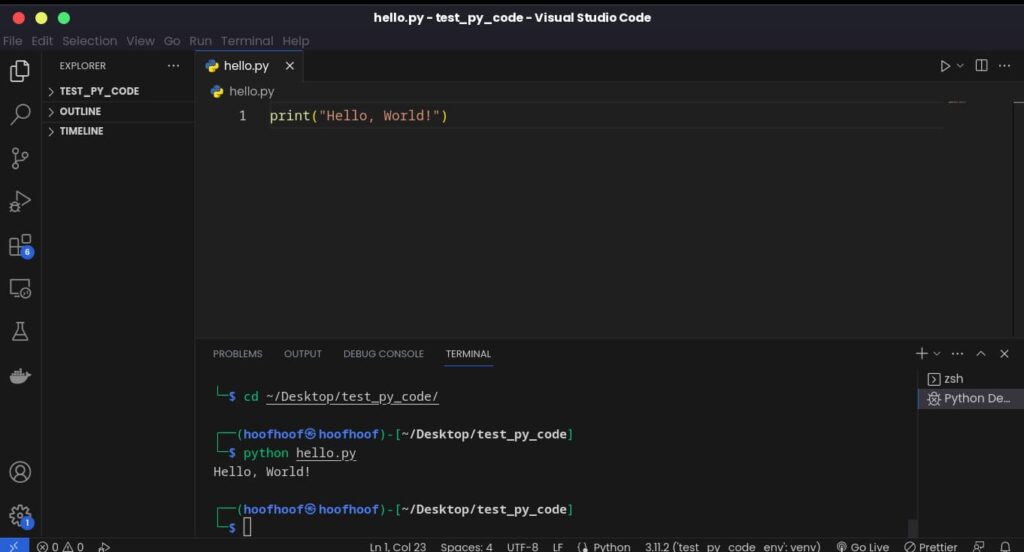
As an example, create a new file by pressing CTRL + N and name it: ‘hello.py”
Then add a simple line of Python code for printing “hello world” in the terminal:
print("Hello, World!")
Step 2: Open the integrated terminal by pressing CTRL + `
Next, you need to open the integrated terminal in VS Code.
You can do this by going to View → Terminal or using the shortcut Ctrl+` (backtick).
Step 3: Navigate to the directory containing your Python script
In the terminal, you need to navigate to the directory (folder) where your Python script is located.
You can use the cd command followed by the directory path.
For example, if your script is in the “Desktop” folder, you can run the following command:
cd DesktopStep 4: Execute the Python script using python command
Once you are in the correct directory, you can execute the Python script using the python command followed by the script file name.
For example, if your script file is named “hello.py”, you can run the following command:
python hello.pyStep 5: View the output in the integrated VS Code terminal
After executing the Python script, you will see the output in the terminal window.
The output can include print statements, error messages, or any other output generated by your script.
For our hello.py example, you should have the following in your VS Code window:
By following these steps, you can easily execute your Python scripts in the VS Code Terminal.
This allows you to test and interact with your code efficiently, making it a valuable feature for Python development in Visual Studio Code.
To learn more about executing Python scripts using the terminal whether Visual Studio Code integrated, Linux Terminal, or Windows command prompt, check out this article: How to run Python files in the Terminal
FAQs
What is the shortcut to run Python files in VS Code
The shortcut for running a Python file in VS Code is Ctrl+F5 (or Command+F5 on macOS). It executes the entire file and displays the output in the terminal window.
What is the shortcut for creating new Python files in VS Code
The shortcut for creating new Python files in VS Code is Ctrl+N (Command+N on macOS). Pressing this shortcut opens a new file in the editor where you can start writing Python code. It offers a quick and convenient way to begin working on Python projects without the need to navigate through menus or manually create new files.
Conclusion
To summarize, here are the actionable steps we took to run Python code in Visual Studio Code:
- Installed Visual Studio Code, a powerful code editor.
- Set up the Python extension in VS Code to enable Python development.
- Opened a Python file in the editor window.
- Used the shortcut Ctrl+F5 or the “Start Without Debugging” option in the Run menu to run the entire Python file.
- Alternatively, selected specific lines of code and used the shortcut Shift+Enter or the “Run Selection/Line in Python Terminal” option to execute only the selected portion.
- Observed the output in the terminal window to see the results of the code execution.
By following these actionable steps, you can effectively run Python code in Visual Studio Code, either for the entire file or specific portions. This approach allows for efficient code execution, debugging, and testing, making development smoother and more productive.