Python is a widely-used programming language known for its simplicity and versatility.
Visual Studio Code (VS Code) is a popular code editor that provides a powerful and user-friendly environment for writing Python code.
If you’re a beginner or even an experienced programmer looking to install Python libraries in Visual Studio Code, you’ve come to the right place.
This article aims to guide you through the process step by step, ensuring you have a thorough understanding of how to install Python libraries in VS Code.
Let’s get started by understanding what a Python library is.
What is a Python library?
Python libraries are pre-written collections of code that provide additional functionality to the Python programming language.
Think of them as ready-to-use tools that help programmers save time and effort by offering solutions to common programming tasks.
So,
A Python library is a package or module containing a set of functions, classes, and variables that can be imported and used in your Python programs.
It extends the capabilities of the core Python language, allowing you to perform complex tasks with ease.
Purpose and benefits of using Python libraries in your Python code
Python libraries serve various purposes, such as data manipulation, web development, scientific computing, machine learning, and more.
By using libraries, programmers can leverage the expertise of others, as libraries are often developed and maintained by experienced Python developers.
This allows you to focus on solving specific problems rather than reinventing the wheel.
Some
Commonly used Python libraries are:
- NumPy: A library for efficient numerical operations and array manipulation.
- pandas: A data analysis and manipulation library, ideal for working with structured data.
- requests: A library for making HTTP requests and interacting with web APIs.
- matplotlib: A plotting library for creating visualizations and graphs.
- scikit-learn: A machine learning library with tools for classification, regression, and more.
- Django: A web framework for building robust and scalable web applications.
I mean, there are a lot of them.
However, to use these libraries in your Python code, you must:
- Install them: You can use a package manager like Pip to install the library on your system. For example, to install the pandas library, you can run the command
pip install pandas. - Import them in your Python code: In your Python program, import the library by adding an import statement at the beginning of your code. For example, to import the pandas library, use the statement
import pandas. - Utilize Library Functions to produce desired programs: Once imported, you can use the functions, classes, and variables provided by the library in your program. For example, if you imported the pandas library, you could use functions like
pandas.read_csv()orpandas.DataFrame().
This promotes code reusability and enables you to leverage the power of existing solutions.
Let’s see how you can do all the steps mentioned above when you are using the popular IDE/code editor, Visual Studio Code.
How to install Python libraries in Visual Studio Code
Installing Python libraries in Visual Studio Code is essential for expanding the capabilities of your Python projects.
There are multiple methods available to install these libraries, each offering its own advantages and convenience.
Here are the different methods for installing Python libraries in Visual Studio Code:
- Using the Integrated Terminal in Visual Studio Code
- Using the Python Package Index (PyPI) and pip
- Installing Libraries from External Sources or Repositories
Here are the detailed steps to installing Python libraries using the different approaches in Visual Studio Code
Using the integrated terminal to install Python libraries in Visual Studio Code
The integrated terminal in Visual Studio Code provides a convenient way to install Python libraries without leaving the editor.
This method is especially helpful if you prefer to stay within the Visual Studio Code environment for your coding tasks.
Follow the step-by-step instructions below to install Python libraries using the integrated terminal:
- Open Visual Studio Code and navigate to the integrated terminal.
- Use the terminal to execute pip commands to install the desired libraries.
- For example, to install the pandas library, you can run the command
pip install pandas.
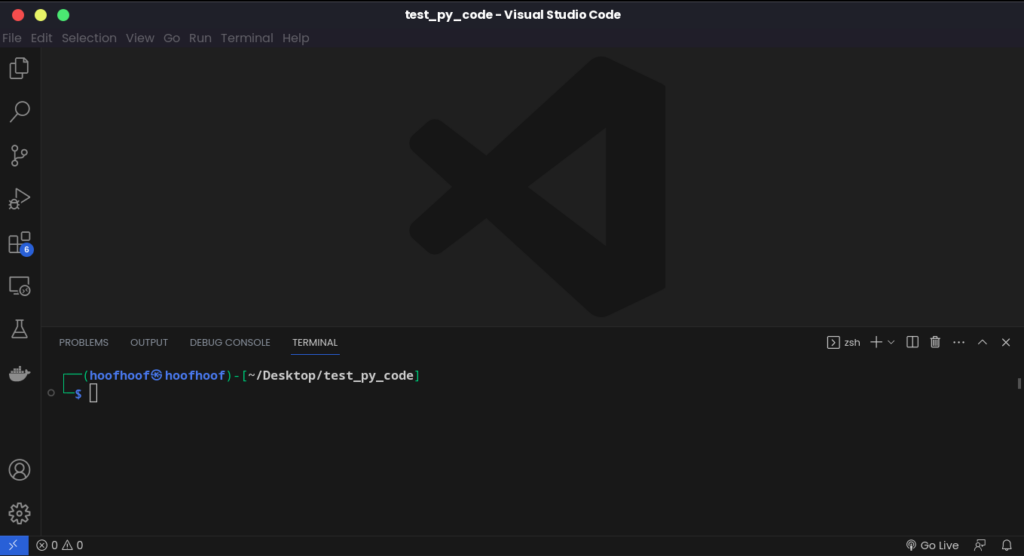
Step 1: Open Visual Studio Code and access the integrated terminal
- Launch Visual Studio Code.
- Open the terminal by navigating to
View -> Terminalor using the keyboard shortcutCtrl +` (Windows/Linux) or CMD+ `(macOS).
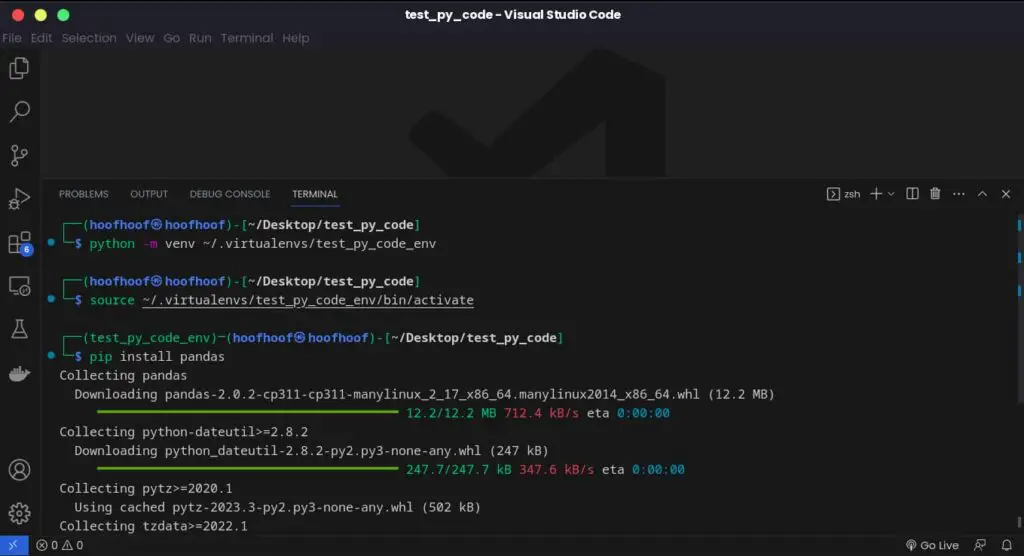
Step 2: Ensure that you have the correct Python environment activated
If you are working with virtual environments, activate the desired environment by running the appropriate command.
For example, if you are using the virtual environment named “myenv”, run source myenv/bin/activate on macOS/Linux or myenv\Scripts\activate on Windows.
So, in the terminal window of Visual Studio Code, execute:
source /path-to-env/bin/activateStep 3: Use pip to install the desired Python library
Run the command pip install library_name to install the library of your choice.
Replace library_name with the actual name of the library.
For instance, to install the pandas library, use the command pip install pandas.
pip install pandasHere’s an example screenshot showing all the previous steps:
Step 4: Verify the installation
- Once the installation is complete, you can verify it by importing the library in your Python code.
- In Visual Studio Code, open a Python file and add the import statement for the installed library at the beginning of your code. For example, if you installed pandas, include the line
import pandas.
Alternatively, you can test a successful library installation through the Python interactive shell:
Importing the library in the Python interactive shell.
Here’s how you can do it
Step 1: Activate the virtual environment (if not activated).
- If you’re working with a virtual environment, activate it by running the appropriate command. For example, if your virtual environment is named “myenv”, use the command
source myenv/bin/activateon macOS/Linux ormyenv\Scripts\activateon Windows.
Step 2: Launch the Python interactive shell.
- In your terminal or integrated terminal in Visual Studio Code, type
pythonand hit Enter to launch the Python interactive shell.
Step 3: Import the installed library.
- Once you’re in the Python interactive shell, import the library by entering the import statement. For example, if you installed the pandas library, type
import pandasand hit Enter.
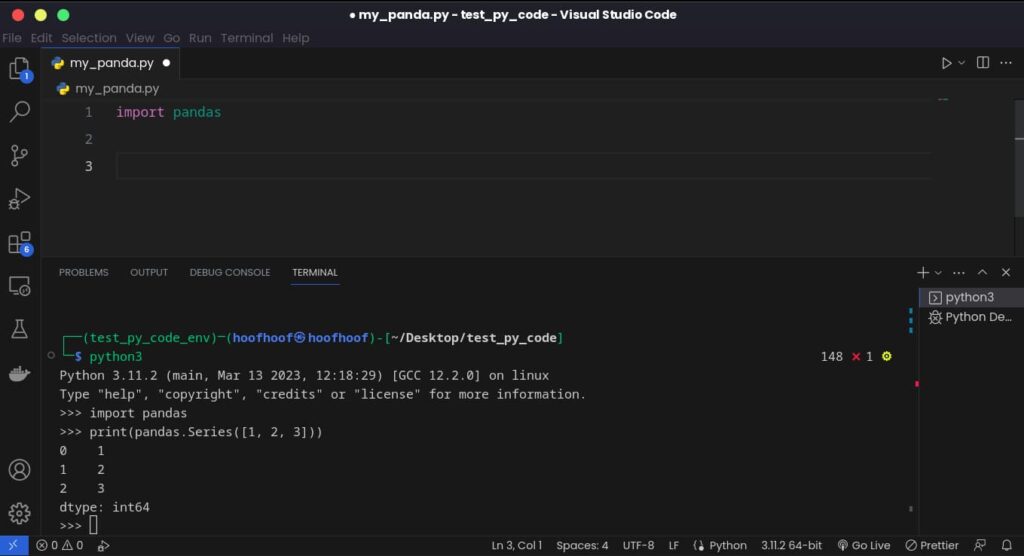
Step 4: Test the library functionality.
- With the library imported, you can now test its functionality. Try using a function or feature provided by the library in the interactive shell.
- For example, if you installed pandas, you can create a sample Serries by typing
print(pandas.Series([1, 2, 3]))and hit Enter. If no errors occur, it indicates that the library is successfully installed and accessible.
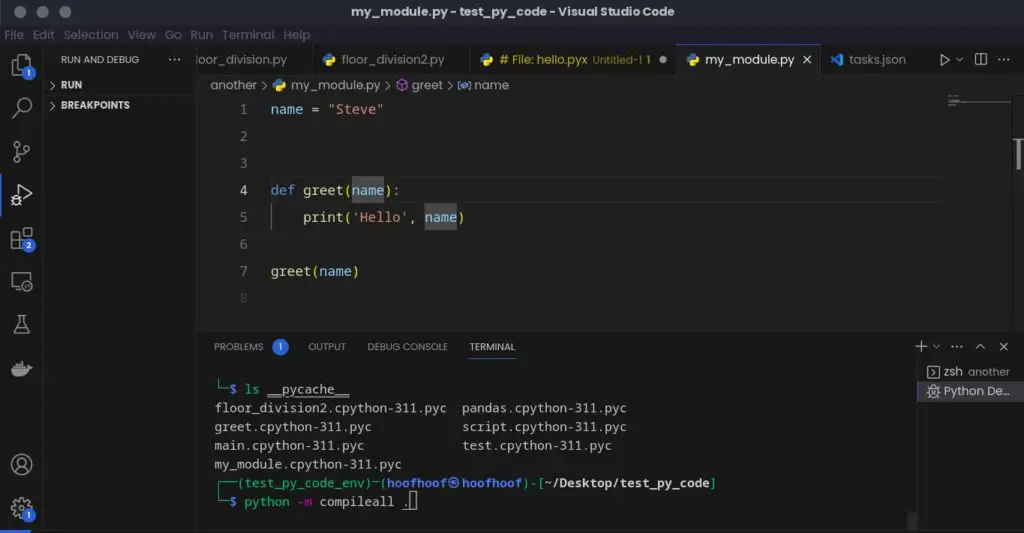
Here’s a screenshot showing the previous steps explained above:
Step 5: Exit the Python interactive shell.
- To exit the Python interactive shell, type
exit()and hit Enter.
By following these steps, you can confirm the successful installation of the library and ensure that it is functioning correctly in your Python environment.
If any errors occur during the import or usage of the library, it may indicate an installation issue or incompatible dependencies.
In that case, repeat the steps above and ensure you are not getting any errors.
Step 5: Start using the library in your code
- With the library successfully installed, you can now utilize its functions, classes, and variables in your Python code.
- Refer to the library’s documentation for specific usage instructions and examples to incorporate the library’s features effectively into your projects.
By utilizing the integrated terminal in Visual Studio Code, you can easily install Python libraries while staying within your coding environment.
This approach offers a seamless experience and allows you to efficiently manage your library dependencies.
Remember to explore the vast array of Python libraries available to enhance your programming capabilities.
Using Pypi and pip to install Python libraries in VS Code
One of the most widely used and convenient methods for installing Python libraries in Visual Studio Code is through the Python Package Index (PyPI) and the pip package manager.
PyPI is a repository that hosts a vast collection of Python libraries, making it a valuable resource for developers.
Pip, on the other hand, is a command-line tool that comes bundled with Python and allows you to easily install and manage these libraries.
To install Python libraries using PyPI and pip in Visual Studio Code, follow these step-by-step instructions:
- Open a command prompt or terminal outside of Visual Studio Code.
- Use the pip command to install the libraries you need.
- For example, to install the Django package, you can run the command
pip install django.
Step 1: Open a Terminal
- Launch the Terminal by locating the app icon in the Apps list.
- Alternatively, you can use CTRL + ALT + T shortcut command on Linux to open a new Terminal window.
Step 2: Activate the virtual environment associated with the project you are working on (if there is )
But first,
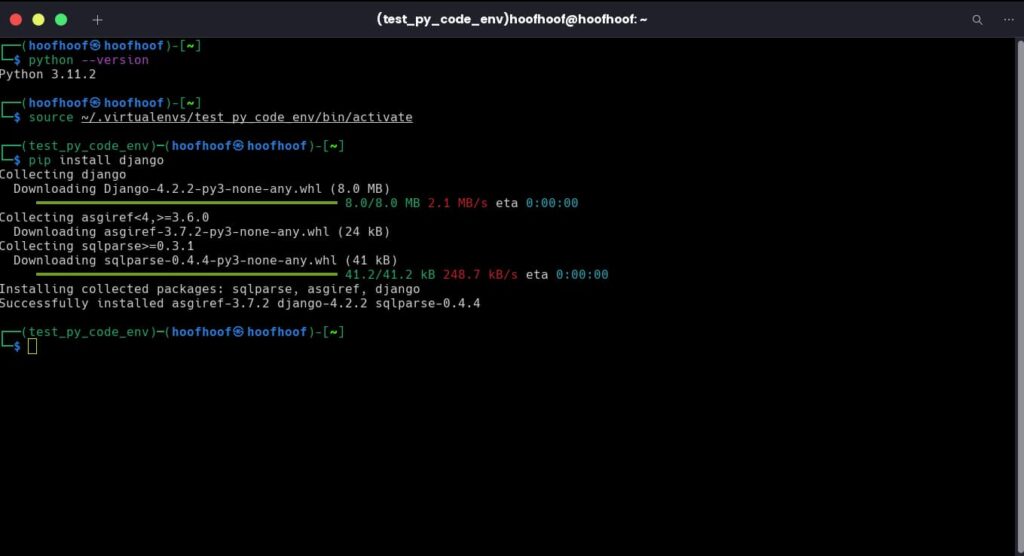
In the terminal, type python --version and press Enter to ensure that Python is installed and the correct version is displayed.
If not, you need to install Python before proceeding.
Activate the desired environment by running the appropriate command.
For example, if you are using the virtual environment named “myenv”, run
source myenv/bin/activateon macOS/Linux ormyenv\Scripts\activateon Windows.
So, in the terminal window, execute:
source /path-to-env/bin/activateStep 3: Install a Python Library
- To install a library, type
pip install library_namein the terminal, replacinglibrary_namewith the name of the library you want to install. For example, to install the Django package, you would enterpip install django. - Press Enter to execute the command. Pip will automatically download and install the library and its dependencies.
Here’s a graphic showing all the steps:
Step 4: Verify the Installation in the Visual Studio Code
- Once the installation is complete, you can verify it by importing the library into a Python program.
- Create a new Python file in Visual Studio Code or open an existing one.
- Add the following line at the beginning of your code:
import library_name, replacinglibrary_namewith the name of the library you installed. - If you don’t encounter any errors, it means the library is successfully installed and ready to use.
Some Tips when installing PyPi packages using pip, mate:
- Upgrading a Library: To upgrade an already installed library to the latest version, use the command
pip install --upgrade library_name. For example,pip install --upgrade pandas. - Installing a Specific Library Version: If you need to install a specific version of a library, you can specify it by appending the version number after the library name. For example,
pip install library_name==version_number. Replaceversion_numberwith the desired version, such as1.0.2.
Using PyPI and pip provides a straightforward way to install Python libraries in Visual Studio Code.
By following the steps outlined above, you can quickly enhance your Python projects with the desired libraries.
Installing libraries from external sources or repositories (not from PyPi)
In some cases, you may need to install Python libraries that are not available on the Python Package Index (PyPI) or you may wish to build from the source.
These libraries can be obtained from external sources or repositories.
Although this installation method requires additional steps, it provides access to a wider range of libraries tailored to specific needs.
Here’s how you can install libraries from external sources or repositories:
- Some libraries may not be available on PyPI but can be installed from other sources or repositories.
- Refer to the library’s documentation for instructions on how to install it from these alternative sources.
- For example, you might need to download a library’s source code and run a specific installation command or script.
Identify the Library and Source
Determine the specific library you need and find out if it is available from an external source or repository.
This information can usually be found in the library’s documentation or website.
Download the Library
Locate the source of the library and download the necessary files or source code. The repository may provide a downloadable package or a link to the source code repository (e.g., GitHub).
Alternatively, most of the packages can be downloaded using wget:
Follow:
Open a terminal or command prompt on your computer.
Navigate to the directory where you want to save the library.
Use the wget command followed by the URL of the library to download it directly from the command line.
For example:
wget https://example.com/library.zip
Replace https://example.com/library.zip with the actual URL of the library you want to download.
Extract the Library (if applicable)
If the library is provided as a compressed archive file (e.g., .zip or .tar.gz), extract its contents to a directory of your choice.
This step may not be required for all libraries.
Open a Terminal or Command Prompt
Open a terminal or command prompt outside of Visual Studio Code to execute the installation commands.
Navigate to the Library’s Directory
Use the cd command to navigate to the directory where you extracted the library or where the library’s source code is located.
This step is necessary if you extracted the library to a specific directory.
Run the Installation Command
- Refer to the library’s documentation for the specific installation command or script to execute. This command may vary depending on the library and its installation requirements.
- For example, if you are installing a library called “mylibrary,” you might run a command like
python setup.py installorpip install .in the library’s directory.
Verify the Installation
After the installation process completes, verify that the library was successfully installed by importing it into your Python program or using a test script.
If there are no errors, the library is now ready to be used.
Remember to carefully follow the installation instructions provided by the library’s source or repository.
These steps may vary depending on the library and its specific requirements.
By installing libraries from external sources, you can unlock additional functionality and tailor your Python projects to meet your specific needs.
To recap,
Choose the one that fits you or based on the comparison table below showing the different approaches to installing Python libraries in Visual Studio Code:
| Method | Pros | Cons |
|---|---|---|
| Integrated Terminal in VS Code | Easy to use within the Visual Studio Code environment. | Requires familiarity with the terminal and command line. |
| PyPI and pip | Widely used and supported method. | Requires switching between Visual Studio Code and terminal. |
| External Sources or Repositories | Allows installation of libraries not available on PyPI. | Requires additional steps and may be less straightforward. |
The following sections contain how to install the popular libraries in Visual Studio Code. Enjoy!
Example 1: How to install and import numpy in VS Code
NumPy is a widely-used Python library for numerical computing and array operations.
Let’s walk through the step-by-step process of installing and importing NumPy in Visual Studio Code (VS Code).
Step 1: Installing NumPy
Open Visual Studio Code.
Open the integrated terminal by selecting View > Terminal from the menu, or by using the shortcut Ctrl + `.
In the terminal, type the following command and press Enter to install NumPy:
pip install numpy
This command will download and install the NumPy library on your system.
Step 2: Importing NumPy into Your Python Program
After installing NumPy, you can import it into your Python program to use its powerful functionalities. Here’s how:
- Create a new Python file in Visual Studio Code or open an existing one.
- At the beginning of your Python file, add the following line of code to import the NumPy library:
import numpy as npThis line imports the NumPy library and assigns it the alias np, which is a common convention.
Step 3: Using NumPy in Your Program
Once NumPy is imported, you can use its array operations and numerical computing capabilities in your program.
Here’s an example showing sum and mean operations using numpy:
import numpy as np

# Create a NumPy array
my_array = np.array([1, 2, 3, 4, 5])

# Perform calculations with NumPy
sum_of_array = np.sum(my_array)
mean_of_array = np.mean(my_array)

# Print the results
print("Sum of the array:", sum_of_array)
print("Mean of the array:", mean_of_array)
In the above example, we import NumPy using the alias np and create a NumPy array my_array. We then use NumPy functions np.sum() and np.mean() to calculate the sum and mean of the array, respectively. Finally, we print the results.
By following these steps, you can install NumPy in Visual Studio Code and leverage its powerful capabilities for numerical computing and array operations.
Feel free to explore the extensive documentation and examples provided by the NumPy community to further enhance your Python projects.
Example 2: How to install and import cv2 library in VS Code
The cv2 library, also known as OpenCV, is a popular computer vision library that provides various functions and tools for image and video processing.
If you’re working on projects that involve computer vision tasks, installing and importing the cv2 library in Visual Studio Code is essential.
Follow the step-by-step process below to install and use cv2 in Visual Studio Code.
Step 1: Install OpenCV (cv2) Library
- Open Visual Studio Code and navigate to the integrated terminal. Open the integrated terminal by selecting View > Terminal from the menu, or by using the shortcut Ctrl + `.
- Run the command
pip install opencv-pythonto install the cv2 library.- This command installs the Python binding for OpenCV, which allows you to access its functionalities.
pip install opencv-pythonStep 2: Import the cv2 Library into Your Python Program
Open a new Python file or an existing project in Visual Studio Code.
At the beginning of your Python file, add the following import statement:
import cv2This import statement enables you to access the cv2 library’s functions and classes in your code.
Step 3: Utilize the cv2 Library in Your Python Program
Once you have imported the cv2 library, you can leverage its capabilities for various computer vision tasks.
Here’s an example that demonstrates how to read and display an image using cv2:
import cv2

# Read an image from a file
image = cv2.imread('my_image.jpg')

# Display the image in a window
cv2.imshow('Image', image)
cv2.waitKey(0)
cv2.destroyAllWindows()
- In this example, we import the cv2 library and use the
cv2.imread()function to read an image file (‘image.jpg’). - We then display the image using the
cv2.imshow()function, which opens a window titled “Image” showing the loaded image. - The
cv2.waitKey(0)function waits until a key is pressed, andcv2.destroyAllWindows()closes the image window when the program finishes.
By following these steps, you can successfully install and import the cv2 library in Visual Studio Code.
With cv2 at your disposal, you can explore a wide range of computer vision tasks such as image processing, object detection, and video analysis.
Example 4: How to install Django in Visual Studio Code
Django is a powerful web framework for building robust and scalable web applications with Python.
If you’re looking to develop web projects using Django in Visual Studio Code, you’ll need to install the Django library.
Follow the step-by-step process below to install Django and start building your Django-powered web applications.
Step 1: Open the Integrated Terminal in Visual Studio Code
- Launch Visual Studio Code and open your Django project or create a new one.
- Navigate to the integrated terminal within Visual Studio Code. You can access it by selecting View > Terminal from the menu.
Step 2: Set Up a Virtual Environment
In the integrated terminal, run the following command and press Enter to create a virtual environment:
python -m venv myenv
Replace “myenv” with the desired name for your virtual environment.
If you already have a virtual environment, activate it instead of creating a new one.
Here’s how.
Activate the virtual environment with the appropriate command based on your operating system:
For Windows:
.\myenv\Scripts\activateFor macOS/Linux:
source myenv/bin/activateStep 3: Install Django Using pip
With the virtual environment activated, run the following command and press Enter to install the latest version of Django:
pip install djangoTo install a specific Django version, e.g 4.0, run:
pip install django==4.0Step 4: Verify the Django Installation in VS Code
To verify that Django is installed correctly within the virtual environment, type the following command and press Enter:
python -m django --version
You should see the version number of the Django library printed in the terminal, indicating a successful installation.
Step 5: Start Using Django in Your Project
With Django installed, you can now start using it in your Visual Studio Code project.
Import Django in your Python files using the following statement:
import djangoOr, import a specific class or function, or variable, like this:
from django.db import modelsBy following these steps, you can successfully set up a virtual environment, install Django in Visual Studio Code, and begin developing dynamic web applications with ease.
Remember to activate the virtual environment each time you work on your Django project to ensure the proper isolation and functionality of installed libraries.
FAQs
What should I do if a library installation fails in VS Code?
If a library installation fails, ensure that your internet connection is stable and try again.
How can I install a specific version of a library in Visual Studio Code?
To install a specific version of a library, use the command pip install library_name==version_number. Replace “library_name” with the library’s name and “version_number” with the desired version. For example, to install Django version 4.0, you would run the command: pip install django==4.0
Conclusion
Installing Python libraries in Visual Studio Code is a crucial aspect of Python development, allowing you to unlock the full potential of the language and streamline your coding experience.
Remember, installing libraries is just the beginning.
Continuously exploring new libraries, reading documentation, and engaging with the Python community will help you expand your expertise and become a more proficient Python programmer.
So, don’t hesitate to experiment, explore, and leverage the vast array of Python libraries available.
Whether you’re working on data analysis, web development, machine learning, or any other Python project, installing the right libraries can significantly boost your productivity and efficiency.
That’s it for this article!