As a Python developer, openai has opened a lot of opportunities not limited to creating recommendation systems that understand user preferences, personalization, language translation, and text analysis.
Python developers can leverage the capabilities of GPT models to create interactive applications.
However, when integrating openai GPT into your Python application, it can be frustrating to get the ModuleNotFoundError exception.
But, it can be easy to fix.
Here’s how you fix the “no module named ‘openai’ error.
How to fix No module named openai in Python
To fix the ModuleNotFoundError: No module named ‘openai’ error, you need to
- Install openai library using pip3 in a
- Virtual environment specific to your Python project
- Global Python installation environment
- Configure your IDE to use the right Python3 interpreter
- Upgrade and use pip3 to install openai
Let’s look at each approach to fixing the error: ModuleNotFoundError: No module named ‘openai’
1. Install openai using pip in your virtual environment
The first step to resolving the “ModuleNotFoundError” is to ensure that you have the ‘openai’ module correctly installed in your Python environment.
If you haven’t done so already, you can use the pip package manager to install it.
Open your terminal or command prompt and activate your virtual environment (if you’re using one) to avoid conflicts with other Python installations.
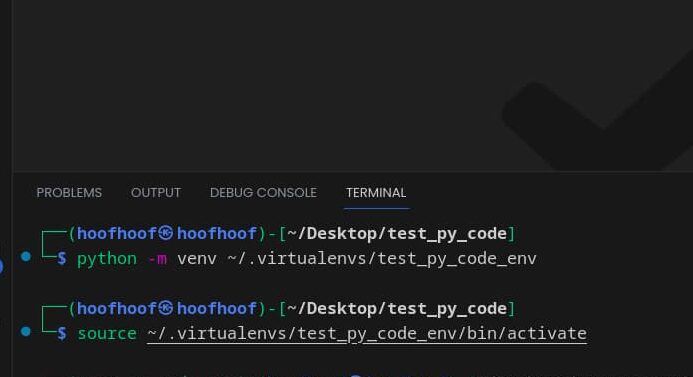
Here’s to command to activate the virtual environment:
# Activate your virtual environment (if applicable)
source path/to/your/virtualenv/bin/activate
After activating the virtual environment, check to see if you have already installed openai library by executing the following command in the terminal:
pip3 show openaiIf you get WARNING: Package(s) not found: openai, then you should install openai library in your virtual environment by running the command:
pip3 install openai
With that, you can run a Python interpreter and try importing openai library (import openai).
You should not get the error no module named ‘openai’ again.
Also, if you execute the pip3 show openai, it should return the details about the openai package.
If you are not using a virtual environment, then you should probably install openai library in your Python global installation environment.
2. Install openai library in the global Python3 installation environment
If you are using the global Python environment, then you should ensure that the ‘openai’ library is correctly installed in your Python3 global environment.
This approach is ideal if you intend to use ‘openai’ across multiple projects or need it readily available in any Python script.
To install the openai library in the global Python3 installation environment, you can follow these steps:
Open a Terminal or Command Prompt: Depending on your operating system, open a terminal window or a command prompt. Make sure you have administrative privileges if required.
Check Python Version: Verify that you have Python 3 installed by typing the following command:
python3 --versionThis should display the version of Python 3 installed on your system. If Python 3 is not installed, you need to install it before proceeding further.
Install openai using pip3: The most straightforward method to install opeain is using the pip3 package manager. In Python 3, the package is named opeain. To install it, run the following command:
python3 -m pip install openaiThis command will download and install the openai library along with its required dependencies.
Verify the Installation: After the installation is complete, you can check if openai is correctly installed by opening a Python interactive shell (REPL) and importing the openai module:
python3import openaiIf no errors are shown, the installation was successful.
NOTE!
Even after installing ‘openai’ and verifying Python version compatibility, you may still encounter the “ModuleNotFoundError”.
This can happen if there are typographical errors in your import statements or if you’ve inadvertently created a file with the same name as ‘openai’ in your project directory, causing a naming conflict.
Always double-check your import statements to ensure they match the correct module name:
import openai
3. Configure your IDE to use the right Python3 interpreter
One common reason for the “No module named openai” error is that the IDE is not using the correct Python interpreter that has openai library installed.
To fix this, you need to configure your IDE to use the right Python3 interpreter.
Here are the steps to do so for Visual Studio Code and Pycharm IDEs:
How to install openai in Visual Studio Code
- Install Python Extension: Ensure you have the Python extension installed in Visual Studio Code. You can install it from the Extensions view by searching for “Python” and clicking on the one provided by Microsoft.
- Open the Project in Visual Studio Code: Open the folder or workspace that contains your Python project in Visual Studio Code.
- Select the Python Interpreter: Once the project is open, click on the Python version in the bottom status bar (usually on the far left side). Alternatively, press CTRL + SHIFT + P to open the command palette and select Python: Select interpreter. If you haven’t configured the interpreter before, it might show “Select Python Interpreter.” If you have multiple Python versions installed, you’ll see a list of available interpreters. Interpreters will also reflect your active virtual environments for your Python projects. Look for the Python3 interpreter or virtual environment path that you used to install
openai. - Select the Correct Interpreter: Choose the correct Python3 interpreter from the list that appears after clicking on the Python version in the status bar. This will associate your project with the selected interpreter.
- Reopen the Terminal: After selecting the correct interpreter, close any existing Terminal windows in Visual Studio Code and reopen a new one to ensure it is using the correct Python environment.
- Install openai if you haven’t: If the Python interpreter you selected or created does not have the openai library installed, you can do so by executing the command:
pip3 install openaito install the library. - Run the Python File: Now, try running your Python script that uses openai. The “ModuleNotFoundError: No module named openai” error should be resolved, as Visual Studio Code will now use the correct Python3 interpreter with the installed openai library.
By following these steps, you should be able to configure Visual Studio Code to use the right Python3 interpreter that has the openai library installed, and your Python scripts should work without any import errors.
How to install openai in PyCharm
To fix the “No module named openai” error in PyCharm, you need to configure the PyCharm IDE to use the correct Python3 interpreter that has openai installed.
Here are the steps to do so:
- Open your Python Project in PyCharm: Open the folder or workspace that contains your Python project in PyCharm.
- Configure Python Interpreter:
- If you are creating a new project, PyCharm will prompt you to select the interpreter during project creation. You can choose the correct Python3 interpreter there.
- If you are working on an existing project, or if you need to change the interpreter for an existing project, follow these steps:
- a. Go to “File” menu > “Settings” (or “Preferences” on macOS) > “Project: [your_project_name]” > “Python Interpreter.”
- b. In the Python Interpreter settings, click on the gear icon (settings) on the top right and select “Show all.”
- c. A dialog box will appear showing the available Python interpreters on your system. Look for the Python3 interpreter that has openai installed. It should be something like “Python 3.x.x” or “python3” depending on your system.
- d. If the correct interpreter is not listed, create a new virtual environment by pressing the gear icon and selecting “Add”. After creating a new virtual environment, don’t forget to install openai by executing:
pip install openai - e. Select the correct interpreter and click “OK” to apply the changes.
- Reopen the Terminal: After configuring the interpreter, close any existing Terminal windows in PyCharm and reopen a new one to ensure it is using the correct Python environment.
- Run the Python File: Now, try rerunning your Python script that uses openai. The “No module named openai” error should be resolved, as PyCharm will now use the correct Python3 interpreter with the installed openai library.
By following these steps, you should be able to configure PyCharm to use the right Python3 interpreter that has the openai library installed, and your Python scripts should work without any import errors.
4. Upgrade to pip3 and use it to install openai library
Upgrading to pip3 and using it to install the openai library can help fix the “No module named openai” error.
The issue might occur due to a mismatch between the Python version and the pip package manager used for installation.
By using pip3, you ensure that you are installing the package for Python 3, which is the version you intend to use.
Here’s a step-by-step on how to upgrade to pip3 and use it to install the openai library:
1. Upgrade pip3 (if needed)
Before proceeding, make sure you have Python 3 installed on your system.
You can check the Python 3 version by running the following command in the Terminal or Command Prompt:
python3 --versionIf you already have pip installed for Python 3, you can skip this step.
Otherwise, you need to upgrade pip to pip3.
In some installations, pip3 comes pre-installed with Python 3.
You can check this by running:
pip3 --versionIf pip3 is not installed, you can upgrade pip by running the following command:
python3 -m pip install --upgrade pip
2. Install openai using pip3
Once you have upgraded to pip3, you can now use it to install the openai library.
Open your Terminal or Command Prompt and run the following command:
pip3 install openaiThis command will download and install the openai library along with its required dependencies for Python 3.
Verify the Installation
After the installation is complete, you can check if openai is correctly installed by opening a Python interactive shell (REPL) and importing the openai module:
python3
import openaiIf no errors are shown, the installation was successful.
By upgrading to pip3 and using it to install the openai library, you ensure that the correct package is installed for Python 3, and the “ModuleNotFoundError: No module named openai” error should be resolved.
Now, you can use openai in your Python 3 projects without any issues.
How to use openai in Python to confirm it is working
To use OpenAI in Python and confirm that it is working, you can interact with the OpenAI API by making a simple API call.
Here’s a step-by-step guide on how to do it:
a) Import the openai library in your Python code
In your Python script or interactive shell, import the openai module to access its functionality:
import openaib) Use the GPT-3 model API in your code
Set up the OpenAI API key: To interact with the OpenAI API, you need an API key.
If you haven’t already, sign up for an account on the OpenAI website and obtain your API key.
Once you have the API key, set it up in your Python script using the following code:
openai.api_key = "YOUR_API_KEY"
Replace "YOUR_API_KEY" with the actual API key, you obtained from the OpenAI website.
Also, you should keep your credentials as environment variables. Check out this guide to learn more about environment variables in Python.
c) Make an API call
Now you can make an API call to test if OpenAI is working.
A simple API call you can use to generate text is the openai.Completion.create() method.
Here’s an example:
prompt_text = "Once upon a time"
response = openai.Completion.create(
    engine="text-davinci-002",
    prompt=prompt_text,
    max_tokens=50
)

generated_text = response["choices"][0]["text"]
print(generated_text)
In this example, the code sends the prompt_text to the OpenAI API, and it generates additional text to complete the prompt.
The response will be stored in the response variable, and the generated text will be extracted and printed.
Execute your Python code
Run the code: Save your Python script and run it.
If everything is set up correctly, you should see the generated text printed in the console meaning that you have successfully resolved the ModuleNotFoundError: No module named openai.
If still you haven’t figured it out yet, here are a couple of reasons leading to the ModuleNotFoundError: No module named ‘openai’ that should help you troubleshoot your specific scenario.
Why can’t you import openai in Python?
If you can’t import OpenAI in Python, check for these common issues:
- Make sure you’ve installed OpenAI in your virtual environment (pip3 install openai),
- Activate the correct environment in terminal (source path-to-venv/bin/activate on Linux/MacOS or source path-to-venv\Scripts\activate),
- VS Code (Ctrl+Shift+`), or PyCharm IDEs have the correct active Python interpreter with openai library installed,
- Avoid typos in import statements, and
- Check your global Python installation for missing OpenAI library.
Take these actions to resolve the import problem.
Troubleshoot pip install openai not working
If you are facing issues with pip install openai not working, there are a few troubleshooting steps you can take:
1. Use pip version 3:
Ensure you are using the correct pip version for Python 3.
In some installations, you may have both Python 2 and Python 3 installed, and the default pip command might be associated with Python 2.
To install with pip for Python 3, use pip3:
pip3 install openai2. Upgrade pip and install openai:
If you encounter errors with pip3, upgrade pip and then try installing openai:
python3 -m pip install --upgrade pip
pip3 install openai
3. Check Python in PATH:
Ensure that Python is added to your system’s PATH environment variable.
During Python installation, there is usually an option to “Add Python to PATH.”
If you didn’t select this option or you are still facing issues, you can reinstall Python and make sure to enable “Add Python to PATH” during the installation process.
After reinstalling Python or making changes to the PATH, reopen your terminal or command prompt to ensure the changes take effect.
Then install openai again:
pip3 install openaiThat’s it for this article!
Create, inspire, repeat!