Most of the time, I experience an error or two between my Django local development and production environments.
While most of the problems are usually related to my code, others are usually related to Django.
Anything wrong with your Python or Django installation, either in your virtual or global environment will usually lead to python manage.py runserver not working for you.
Let’s look at a couple of reasons why the Django development server may produce some errors that will delay you from achieving your project deadlines.
And some solutions, obviously. Hmmm!
Why python manage.py runserver is not working
When working with Django, the python manage.py runserver command is a vital part of the development process.
However, there are instances where this command may not work as expected, leading to frustrating errors.
Several factors can contribute to this issue, such as
- Missing Python or Django installations,
- Problems with virtual environment activation,
- Navigating to the wrong directory, or even inadvertently
- Blocking localhost (127.0.0.1) behind a firewall.
Let’s explore each problem at a time and look at some solutions to help you overcome the runserver command not working for you.
Missing Python installation leading to (Manage py is not recognized as an internal or external command, operable program or batch file) on Windows or (Command ‘python3’ not found) on Linux errors
One of the common reasons why you may encounter errors like
- “Manage.py is not recognized as an internal or external command, operable program or batch file” on Windows or
- “Command ‘python3’ not found” on Linux
when attempting to run the python manage.py runserver command is a missing Python installation on your system.
Python serves as the foundation for Django, and without Python installed, the system won’t recognize the necessary Python commands or the manage.py file.
Therefore, the utmost solution is to install Python on your specific machine or in your virtual environment if you are using one.
Let’s look at each of these and how you can solve the Python installation problem on your machine.
(Manage py is not recognized as an internal or external command, operable program or batch file) error on Windows
Before trying to install Python on Windows, first, check if Python is installed on your system.
Here’s how you do that:
Open the command prompt and execute the following command:
python3 --versionIf Python is installed, it will display the version number.
If you see an error or the command is not recognized, then you should definitely install Python on your Windows machine.
Here are the steps you need to take to install Python on Windows:
Step 1: Download and install Python from python.org’s official website
Visit the official Python website at https://www.python.org/downloads/windows and download the appropriate Python installer for your Windows version.
Make sure to select the correct version (preferably Python 3.x) and follow the installation instructions provided by the installer.
Step 2: Verify the installation
After the installation is complete, open a new command prompt window and run the python3 --version command again.
python3 --versionIt should display the Python version without any errors, confirming that Python is installed correctly.
Step 3: Set up the PATH variable to prevent (Python is not recognized as an internal or external command) error
In some cases, even after installing Python, you may still encounter the “Manage.py is not recognized” or “Python is not recognized” errors.
This can occur if the Python executable is not added to the system’s PATH variable.
To resolve this, follow these steps:
- Where Windows is installed (in your C directory), locate the Program Files directory and navigate into the folder. Inside the folder look for the directory where Python is installed. The directory should have the format (Python36)
- Navigate into the Python installation directory (C:\Program Files\Python36) and copy its path by clicking at the menu bar showing the current location you are in in your File Manager app.
- GO back to your desktop folder
- Right-click on the “This PC” icon and proceed to the Properties tab. Under “Advanced system settings”, locate the “Environment variables” section.
- Click on the “Environment Variables” button.
- In the “System Variables” section, scroll down and select the “Path” variable. Click the “Edit” button.
- In the “Edit Environment Variable” window, click “New” and paste the path to your Python installation directory you copied earlier. By default, it is usually something like
C:\Program Files\Python36\Click “OK” to save the changes. - Close the command prompt window and open a new one. Try running the
python --versioncommand again, and it should work correctly.
For Linux: (Command ‘python3’ not found)
If you are using a Linux machine like me, then you should follow these steps to ensure you have the latest Python installed on your system.
Although most Linux operating systems come with Python installed, it is good to check the version you are running and probably upgrade to the latest version.
Besides, if you are running an old distro version, you may have Python version 2 installed. Thus, it would be great to install Python version 3.
But first,
Check if Python is installed.
To do that,
Open the terminal by pressing CTRL + ALT + T and execute the following command:
python3 --versionIf Python is installed, it will display the version number.
If you see an error or the command is not recognized, proceed to the next step which involves installing Python on Linux.
Here are the steps you need to take to install Python on Linux:
Step 1: Update your system package manager repo and system
We will use the yum and apt package managers to install Python. Thus, we should obviously update them first by running these two commands:
sudo apt update

sudo apt upgrade
sudo apt update command refreshes the packages repository to fetch the latest version while the sudo apt upgrade upgrades the already installed packages and their dependencies to the latest version.
If you are using the Yum package manager, run:
sudo yum update

sudo yum upgrade
For DNF package manager:
sudo dnf update

sudo dnf upgrade
Next, install Python
Step 2: Install Python using the appropriate package manager for your Linux system
Run the appropriate command in the terminal based on your Linux distribution:
For Ubuntu or Debian-based:
sudo apt install python3For CentOS or Fedora:
sudo yum install python3Step 3: Verify Python installation
After the installation is complete, run the python3 --version command again in the terminal.
python3 --versionIt should display the Python version without any errors, confirming that Python is installed correctly.
For Unix-based system (MacOS): (Command ‘python3’ not found)
If you’re using a Unix-like system such as macOS for your Python programming, you can verify you have Python installed or install it by following these steps:
Step 1: Check if Python is installed
Open the terminal and execute the following command:
python3 --version
If Python is installed, it will display the version number.
If you see an error or the command is not recognized, then install Python.
Step 2: Install Python
MacOS comes pre-installed with Python 2.7, but it’s recommended to use Python 3.x for Django projects.
Follow these steps to install Python 3:
- Visit the official Python website at https://www.python.org/downloads/ and download the latest Python 3.x installer for MacOS.
- Double-click on the downloaded file to run the installer.
- In the Python installer, select “Install for all users” and click “Continue”.
- Choose the destination for the installation. By default, it is usually set to
/Library/Frameworks/Python.framework/Versions/3.x, wherexrepresents the version number. - Click “Install” to begin the installation.
- The installer will prompt you to enter your password. Provide your system password to allow the installation to proceed.
Step 3: Verify Python installation
Once the installation is complete, open a new terminal window and run the python3 --version command again.
python3 --versionIt should display the Python 3 version without any errors, confirming that Python is installed correctly.
Additionally, you can verify the installation by running the which python3 command in the terminal.
which python3It should return the path to the Python 3 executable.
Python is the programming language on which Django is built, and without Python installed, your system won’t recognize the python command or the manage.py file.
By ensuring that Python is installed on your system and properly configured, you can overcome the
- “Manage.py is not recognized as an internal or external command, operable program or batch file” error on Windows,
- “Command ‘python3’ not found” error on Linux, or similar
- Python-related errors on MacOS.
Missing Django installation globally or in a virtual environment (ModuleNotFoundError: No module named ‘django’)
Another reason why you may encounter an error like “ModuleNotFoundError: No module named ‘django'” when running the python manage.py runserver command is the absence of a Django installation on your system.
Django is a Python web framework that is required to run Django projects, and without it, the system will not recognize the ‘django’ module.
You will receive the “ImportError: Couldn't import Django. Are you sure it's installed and available on your PYTHONPATH environment variable?” error if you haven’t installed Python in your active virtual environment.
To resolve this issue, you need to ensure that Django is installed either globally or within a virtual environment.
Here’s how you can address this problem:
1. Installing Django globally:
If you intend to use Django for multiple projects or prefer a global installation, follow these steps:
- Open the command prompt or terminal.
- Execute the following command to install Django globally:
pip install django. This command will download and install the latest stable version of Django from the Python Package Index (PyPI). - Wait for the installation to complete. Once finished, Django will be installed globally on your system, allowing you to run the
python manage.py runservercommand.
2. Installing Django in a virtual environment:
Using a virtual environment is recommended to isolate project dependencies and avoid conflicts between different Django projects.
Here’s how you can install Django within a virtual environment:
- Open the command prompt or terminal.
- Navigate to your project directory using the
cdcommand. For example:cd path/to/your/project - Create a new virtual environment using the following command:
python -m venv myenv. Replacemyenvwith the name you prefer for your virtual environment. - Activate the virtual environment:
- For Windows:
myenv\Scripts\activate - For Linux/macOS:
source myenv/bin/activate
- For Windows:
- Once the virtual environment is activated, you can proceed with installing Django. Execute the following command:
pip install django - Wait for the installation to complete. Django will now be installed within the virtual environment.
By ensuring that Django is installed either globally or within a virtual environment, you can resolve the “ModuleNotFoundError: No module named ‘django'” error.
This will allow you to successfully run the python manage.py runserver command and start your Django project without any issues.
Remember to activate the virtual environment before running the server if you have installed Django within a virtual environment.
Otherwise, you may get “Did you forget to activate a virtual environment?” alert when you try to run python manage.py runserver command.
Let’s look at this problem and see how you can correctly activate the right virtual environment if you have Django installed.
Failing to activate the virtual environment
Another reason why you may encounter issues when running the python manage.py runserver command is the failure to activate the virtual environment.
Django projects often utilize virtual environments to isolate dependencies and ensure project-specific package installations.
If you haven’t activated the virtual environment correctly, the necessary packages, including Django, might not be accessible, resulting in errors.
To resolve this issue, it is crucial to activate the virtual environment before running the python manage.py runserver command.
Here’s how you activate the virtual environment:
For Windows:
- Open the command prompt.
- Navigate to your project directory using the
cdcommand. For example:cd path\to\your\project - Activate the virtual environment by running the activate script command:
myenv\Scripts\activate. Replacemyenvwith the name of your virtual environment of your specific Django project if you have multiple of them on your system. - Once the virtual environment is activated, you will see the environment name in the command prompt, indicating that you are now working within the virtual environment.
For Linux and macOS:
- Open the terminal using the CTRL + ALT + T shortcut or locate the Terminal app in the Apps List
- Navigate to your project directory using the
cdcommand. For example:cd path/to/your/project - Activate the virtual environment by running the activate script source command:
source myenv/bin/activate. Replacemyenvwith the name of your specific Django project virtual environment. - Upon successful activation, the terminal prompt will display the name of the virtual environment, indicating that you are now working within the virtual environment.
By activating the virtual environment before running the python manage.py runserver command, you ensure that Django and other project-specific dependencies are available.
This will prevent errors related to the module not found or missing package dependencies and allow you to successfully start the Django development server.
Remember to activate the virtual environment each time you work on your Django project to ensure a smooth and error-free development experience.
You are navigated in the wrong directory (No such file or directory)
Another reason why you may encounter difficulties when running the python manage.py runserver command is navigating to the wrong directory.
Django projects consist of multiple files and directories, and it’s crucial to be in the correct directory containing the manage.py file when executing the command.
Failing to do so can lead to errors such as “No such file or directory.”
To overcome this issue and ensure you are in the correct directory, follow these steps:
Step #1: Open your command prompt or terminal.
Step #2: Use the cd command to navigate into the right directory for your Django project
Use the cd command to navigate to the root directory of your Django project.
For example:
cd path/to/your/project
Replace path/to/your/project with the actual path to your Django project’s root directory.
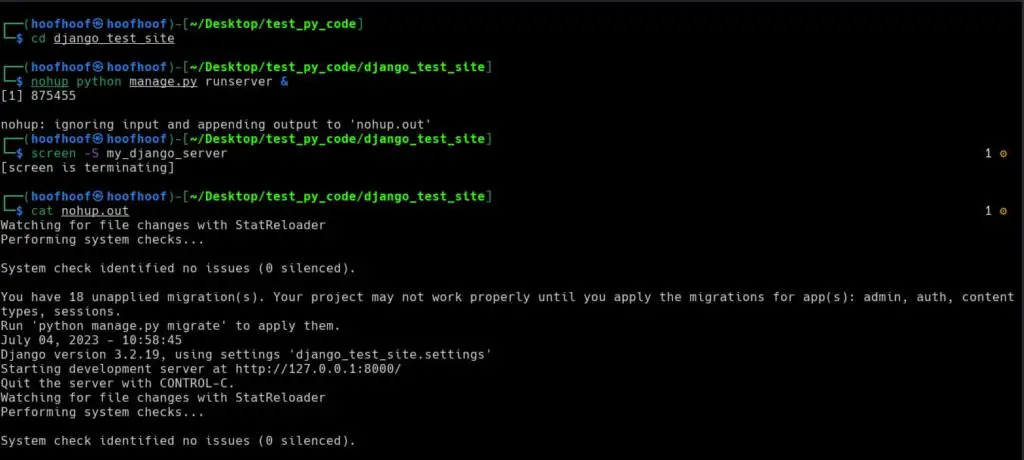
Let’s say I have a project in my Desktop folder. My project name is projectMeow. Thus, to navigate into my project directory, I should use:
cd ~/Desktop/projectMeowIf I list the contents of the directory using the ls command, I should see the manage.py file in the root directory of my project.
You should note that the example above works when I have used the
django-admin startproject projectMeow .If you use the command
django-admin startproject projectMeowwithout the dot, you should navigate into the extra directory created by Django for the project.So, you naviagetion should look like this (using my Desktop’s projectMeow:
cd ~/Desktop/projectMeow/projectMeow
Step #3: Once you are in the correct directory, you can run the python manage.py runserver command.
python manage.py runserverNOTE:
It’s essential to verify that you are in the correct directory before executing the command.
You can confirm your location by checking the presence of the
manage.pyfile in the current directory using thelscommand (for Linux and macOS) or thedircommand (for Windows).If you don’t see the
manage.pyfile listed, it means you are not in the correct directory, and you should navigate to the correct location using thecdcommand.
Navigating to the correct directory ensures that the manage.py file and other project-related files are accessible, allowing you to run the python manage.py runserver command without encountering any “No such file or directory” errors.
Remember to always double-check your current directory and make sure you are in the right place before running any Django commands to avoid unnecessary errors and frustrations in your development workflow.
You have blocked localhost (127.0.0.1) or browser app behind a firewall
Sometimes, when you try to run the python manage.py runserver command, you might encounter issues if your firewall settings are blocking the connection to localhost (127.0.0.1) or the browser app you are using.
Firewalls are designed to protect your system by regulating network traffic, but they can also unintentionally block the connections necessary for running the Django development server.
To address this issue, you will need to adjust your firewall settings to allow access to localhost or the specific browser app you are using.
Here’s a step-by-step guide to help you through the process:
1. Check your firewall settings
Start by verifying if your firewall settings are the cause of the problem.
Disable your firewall temporarily and attempt to run the python manage.py runserver command again.
If the command works with the firewall disabled, it confirms that the firewall settings are preventing the connection.
2. Adjust firewall settings for localhost
If you are using a firewall software or antivirus program with built-in firewall capabilities, follow these general steps to allow connections to localhost (127.0.0.1):
- Locate your firewall software or antivirus program.
- Open the program and navigate to the firewall settings.
- Look for an option to add an exception or allow an application.
- Add an exception for the Python executable or the browser app you are using. This might involve specifying the path to the Python executable (
python.exe) or the browser app’s executable file (chrome.exe,firefox.exe, etc.). - Save the changes and exit the firewall settings.
Specific steps may vary depending on the firewall software you are using. Consult the documentation or support resources for your firewall software for more detailed instructions.
3. Adjust firewall settings for the browser app
In some cases, the firewall settings might specifically block the browser app you are using to access your Django application.
To address this, follow the steps below:
- Open your firewall software or antivirus program.
- Locate the firewall settings and look for an option to manage application permissions or exceptions.
- Find the entry for your browser app (e.g., Chrome, Firefox) and ensure it is allowed or given appropriate permissions to access the network.
- Save the changes and exit the firewall settings.
By adjusting your firewall settings to allow connections to localhost (127.0.0.1) or your browser app, you can ensure that the python manage.py runserver command can establish the necessary connection and run your Django application without any firewall-related obstacles.
For Linux/MacOS
If you are encountering issues with running the python manage.py runserver command on Linux or macOS due to firewall restrictions, you can follow the steps below to adjust the firewall settings and allow the necessary connections:
On Linux:
Linux distributions commonly use a firewall called iptables or its successor nftables. To modify the firewall settings, you will need administrative privileges.
Here’s a general approach:
Open a terminal on your Linux system.
Check if a firewall is active by running the following command:
sudo iptables -L
This command displays the current firewall rules. If you see an output indicating an active firewall, proceed to the next step. If there is no output or an error message, it means no firewall rules are in place.
Identify the rule that is blocking the necessary connections.
Look for rules related to the specific port or service used by your Django application.
For example, if your Django app runs on port 8000, search for a rule involving that port.
Remove or modify the rule using the appropriate command.
For instance, to delete a rule blocking port 8000, run:
sudo iptables -D INPUT -p tcp --dport 8000 -j DROP
Replace
8000with the actual port number you need to unblock.
If you’re using nftables, the command is similar.
Check if the firewall is active:
sudo nft list tables
Remove or modify the rule as necessary:
sudo nft delete rule inet filter input tcp dport 8000
Adjust the port number accordingly.
On macOS:
macOS utilizes a built-in firewall called “pf” (Packet Filter) to manage network traffic. Follow these steps to adjust the firewall settings on macOS:
- Click the Apple menu in the top-left corner and select “System Preferences.”
- Choose the “Security & Privacy” option.
- Select the “Firewall” tab.
- If the lock icon at the bottom-left corner of the window is locked, click it and enter your administrator password to make changes.
- Click the “Firewall Options…” button.
- Look for an entry corresponding to your browser app or the Python executable.
- Ensure the entry is set to “Allow incoming connections” or “Automatically allow signed software to receive incoming connections.”
- If you don’t see the necessary entry, click the “+” button to add it manually. You can navigate to the Python executable or select your browser app from the Applications folder.
- Click “OK” to save the changes.
- Close the “Security & Privacy” window.
Start to Finish Solution: How to run Django development server (runserver)
Running the Django development server (runserver) correctly is crucial for your Django web applications.
This step-by-step guide will help you through the process, covering the essentials, which should probably avoid any manage.py runserver issues.
Here’s what you need to do, in summary:
- Install Python on your Linux, Windows, or macOS machine.
- Create a new virtual environment and activate the correct virtual environment with Django installed.
- Install Django (if you haven’t) in your active virtual environment.
- Navigate to your Django project directory, and ensure the presence of the
manage.pyfile. - Run your Django development server.
1. Install Python on your Linux, Windows, or MacOS machine
Before you can run the Django development server, it’s essential to have Python installed on your machine.
Python is a programming language that Django is built upon, and having it installed allows you to execute Django commands and run your web applications.
Follow the instructions below to install Python:
- Linux: Most Linux distributions come with Python pre-installed. Open a terminal and type
python --versionto check if Python is already installed. If not, you can install it by running the following command based on your distribution:- Ubuntu/Debian:
sudo apt install python3 - CentOS/Fedora:
sudo dnf install python3
- Ubuntu/Debian:
- Windows: Visit the official Python website (python.org) using your web browser. On the downloads page, click on the “Download Python” button. Select the latest version compatible with your Windows system (either 32-bit or 64-bit), then run the installer. Follow the prompts and ensure that the “Add Python to PATH” option is selected. Click “Install Now” and wait for the installation to complete.
- macOS: Open a web browser and visit the official Python website (python.org). On the downloads page, click on the “Download Python” button. Choose the macOS installer package (.pkg) for the latest version of Python compatible with your macOS version. Once the download is complete, run the installer and follow the on-screen instructions.
After successfully installing Python, you can verify the installation by opening a terminal or command prompt and typing python --version. This will display the installed Python version.
2. Activate the correct virtual environment that has Django installed
To ensure a smooth execution of your Django project, it is crucial to activate the correct virtual environment that contains Django installed.
A virtual environment is an isolated environment that allows you to manage and install specific packages for your project without affecting the system-wide Python installation.
Here’s a breakdown of how to activate the correct virtual environment:
- Identify the location of your virtual environment. It is typically a separate directory that contains the necessary Python packages and dependencies for your project.
- Open your terminal or command prompt.
- Navigate to the directory where your virtual environment is located. This is usually accomplished using the
cdcommand followed by the path to your virtual environment directory. - Activate the virtual environment. The command to activate a virtual environment depends on the tool you used to create it. For example:
- If you used
venvorpyenvon Linux or macOS: Run the commandsource <path_to_virtual_environment>/bin/activate. - If you used
virtualenvwrapperon Linux or macOS: Run the commandworkon <virtual_environment_name>. - If you used
condaon Linux or macOS: Run the commandconda activate <virtual_environment_name>. - If you used
virtualenvwrapperon Windows: Run the command<virtual_environment_name>\Scripts\activate.
- If you used
- Once activated, your command prompt or terminal should reflect the virtual environment’s name. This indicates that you are now working in an isolated environment.
3. Install Django (if you haven’t) in your active virtual environment
To work with Django, you need to ensure that it is installed in your active virtual environment. If you haven’t installed Django yet, don’t worry, I will guide you through the process.
Here’s what you need to do:
- Activate your virtual environment: Before installing Django, make sure your virtual environment is active.
- Install Django: To install Django, open your command-line interface and execute the following command:
pip3 install django - Verify the installation: After the installation process completes, you can verify if Django was installed successfully by running the following command:
django-admin --version
4. Navigate into your Django project directory (while checking you have manage.py file)
To run the Django development server successfully, you need to navigate to your Django project directory.
This directory contains essential files for your Django application, including the manage.py file.
Here’s how you can accomplish this:
- Launch the terminal or command prompt on your operating system.
- Navigate to your project directory
- Check for the
manage.pyfile: Verify that themanage.pyfile exists in your current directory. This file is generated automatically when you create a new Django project and serves as an entry point for various Django management commands. - If the
manage.pyfile is absent, use thecdcommand to change your current directory to the directory containing themanage.pyfile. - For example, if your project is located in a folder called “myproject,” you would navigate to it using the following command:
cd myproject - Confirm your location: To verify that you have successfully navigated to the correct directory, you can use the
lscommand (on Linux and macOS) or thedircommand (on Windows) to list the files and folders in your current directory. Ensure that themanage.pyfile is listed among them.
By following these steps, you will have navigated to your Django project directory, with the manage.py file in hand, ready to launch the Django development server and start building your web application.